Jump to What Interests you Most

Search This Blog

Thursday, February 28, 2013

HOTD: Hair of the Day

This is my very first HOTD post!  Today I was having such an incredible hair day that I had to share. I couldn't wait!

I did what I said in my last post about preparing my hair for bed. I just applied a dab (literally a dab) of Shea Moisture Curl Enhancing Smoothie to the ends and then put them in chunky twists.

This morning I had to run (I did 8 miles) so I put a headband around the perimeter of my head and then my workout headband. When I showered I wrapped my hair in a scarf so that the condensation wouldn't frizz my hair out.

After I got dressed I untwisted and this is what I was left with.


This is by far the absolute BEST twist-out that I have ever had! I was so excited when I saw my hair! I hardly ever wear my hair out, as in I  never do, because I don't like how it looks. It's usually frizzy, dry and has no movement.

The curly girl method is doing wonders for my moisture retention with very little effort on my part.

The only thing I had on my hair was the conditioner from when I detangled my hair. With the CGM I don't rinse out the conditioner I apply to my hair to help me detangle. To put in the twists I just applied some gel.

I wore my hair out yesterday and today without applying anymore products. Tonight I'm going to try putting it in a bun to see how my hair looks. However, I'm going to wear a protective style because I said I'd only wear it out twice a week.

Tomorrow I should re-wet my hair but I think I will wait until Friday afternoon to redo my hair. I'm loving this style and can't wait to try it again next week!

Don't you love it when you have a complete hair success day?

Tuesday, February 26, 2013

Curly Girl Method: Week 3

While I'm enjoying the CGM method, I find that I don't have time in my schedule right now to "shampoo" twice a week. I'd prefer to re-wet my hair after my initial "shampoo" day so that my hair stays nice and soft but it's not possible.

Here's another style that I wore last week after I did my wash and go. It wasn't that cold outside so I just decided to go with the flow. I wasn't convinced of it's "cute-ness" (yea, I made up a word) but my husband liked it.


This week I put in my pre-poo/deep conditioner on Sunday but I was too lazy to rinse it out. So I just slept with it in my hair. I rinsed it out and shampooed with my conditioner and detangled on Monday. The detangle process is much easier and faster when I do my hair twice a week instead of once a week. Hopefully I have more time in the summer.

However, this week we are going through a cold spell, so I knew I wasn't going to wear my hair out wet. So I put it in some medium-sized twists and wore my beanie. This afternoon I took them down to rock a twist out and I loved the results! This is going to be my go-to style until the warm weather starts.

I will do my hair, twist it up and leave them in for 24 hours. I will rock a twist out for 1-2 days, then after that I will put it in updos. The only thing I had on my hair for the twists was my leave-in conditioner, and some gel. I got the best twist-out results I've ever had.

The pictures below don't even do it justice. It looked nice and full and defined and super soft. These pictures show what my hair looked like before I separated the twists.


I didn't put any oil or anything on my hands when I separated the twists because my hair was incredibly moisturized. The CG method is the best! I then separated them and what I ended up with is below.


I haven't decided how I'm going to prepare my head for bed yet. I will probably put it in a bun (got the idea from a youtuber) or twist it back up in bigger twists.

Then tomorrow I will wear it out and then following days it will be up until I wash it again. I'm truly loving this Curly Girl Method journey.

Monday, February 25, 2013

Vegan Recipe: Vegan Cornbread

This is the easiest recipe ever and goes with absolutely any meal. The first time I made it, it accompanied some vegan chili. I made some minor adjustments but the recipe came from Post Punk Kitchen that has an exhaustive list of vegan eats. Check them out!


Vegan Cornbread
2 cups cornmeal (In Spain all I could find was polenta but it worked out fine)
1 cup all-purpose flour
2 tsp baking powder
1/3 cup vegetable oil
2 Tbsp brown sugar
2 cups non-dairy milk
2 tsp apple cider vinegar
½ tsp salt

Preheat the oven to 350 degrees Fahrenheit and grease and flour a baking pan. In a bowl wisk together the non-dairy milk and vinegar. In a separate bowl mix the dry ingredients together. Add the oil and brown sugar to the non-dairy milk mixture and wisk until it becomes foamy and bubbly, about 2 minutes. Pour the wet ingredients into the dry ingredients and mix to combine. Then add the mixture to the baking pan and bake 30-35 minutes.


Wednesday, February 20, 2013

My Current Weights Routine

The purpose behind this routine is to strengthen my lower body, paying special attention to my quads. I also want to give some attention to my arms.

ARM EXERCISES

These are all done from between 1-3 sets (10-15 repetitions). I usually start with 1 set then add a set each week. Once I get to 3 sets I increase the weights. Right now I'm using 3.5 kilos (or 7.5 pounds).

For all the exercises I've included a photo or a link to a video explaining how to do the exercises. This may seem like a simple circuit (and it is) but it burns like crazy!


Triangle push-up


Bench dip variation with one leg raised


Tricep extension


deadlift


LEG EXERCISES
 For all of these exercises I do 1 set of 25 repetitions. If you'd like to know how to do these exercises I recommend you go to the same website I went to. They have pictures, descriptions and videos that can help you perform all the exercises I have listed below. 

Just go to the search bar and type in the name of the exercise. You can also do a simple google search "quad exercises" and find bodybuilding.com. There you can refine your search. I wanted exercises that didn't require weights (for example).

Mountain climbers
Heel raises
Kneecap clenches
Bridge variation with raised leg
The clam (variation with both legs lifted off floor)
Wall sit
Straight leg raises against the wall
Inner thigh leg lifts
Single leg jump
Single leg squat with a chair
Rear leg raises
Kneeling hip flexor (stretch)
Iron crosses (stretch)
Frog hops
Squat
All-fours quad stretch
Knee extensions
Isometric Quad
Kneeling quad stretch

These are just basic exercises but I wanted something simple to start out with. In a couple weeks I will adjust and change my routine. I hope you try some of these exercises if you haven't already!

Tuesday, February 19, 2013

February 2013 Goals: Update


Just want to jump in here quick to let you all know that I've been sticking to my February Goals and I feel great. 

Two weeks ago, I did weight-training Monday and Wednesday and ran on Tuesday and Thursday. Last week I did my weights Monday, Wednesday and Friday and ran everyday except Monday. That's 4 days a week running and 5 days a week exercising in general.

I haven't done that since the summer. This week I plan to run 12 miles. Last week I ran 10 miles as my long run and then between 4 and 6 miles for the following days. This week I will do much of the same. 

Next week I plan to have a recovery week. So the longest run will be 8 miles and I will only run 3 times a week. Basically I have 2 hard weeks and 1 recovery week. I'm trying to stay injury free and I think this is the way to do it.

After my recovery week I will bump up my long run to 14 miles, then 16 miles, then a recovery week etc. Once I get up to a marathon level of miles I will start contemplating adding on another long run to my week (for a total of 2). That's mostly to start my preparation for the ultramarathon.

Anyway, that's my quick check-in. Let's see how this week goes.

Monday, February 18, 2013

Vegan Recipe: Apple, Radish and Avocado Salad

The salad dressing for the recipe is also courtesy my awesome cookbook Veganomicon: The Ultimate Vegan Cookbook. However, the salad ingredients were all me! I hope you enjoy!


Dressing:
¼ cup apple cider vinegar
½ cup fresh orange juice (1 large orange)
2 Tbsp lime juice (1 lime)
2 Tbsp vegetable oil
2 Tbsp soy sauce
3 Tbsp brown sugar
1 tsp sesame oil
Salad:
Roughly 1 ½ grated apples
A bunch of radishes sliced thinly
1 small red onion sliced thinly
1 ripe avocado sliced thinly

Depending on how much salad you want to make you will have to adjust the ingredients. This recipe is enough for approximately 6 people. Make the salad dressing then add everything except the avocado to the bowl and mix. Once it’s mixed well you can add the avocado and mix gently to distribute. It's a versatile salad in that pretty much anything you desire can be added to it. So be creative! I think some salad greens and/or shredded carrots would be delicious in this salad as well.

Sunday, February 17, 2013

Curly Girl Method: Week 2

The Beginning -- Why the CG Method?

I say week 2, although I've only washed and styled my hair using the CG method 4 times. I received the book in the mail a couple of weeks ago and read it cover-to-cover (DVD included) in a few hours.

Yes, I was excited to try it! It is said that it takes 6 weeks for your "real curl pattern" to emerge, or to "train" your hair. So this will be a 6 week initial journey to see how my hair develops.

My reasons for trying the CG method were simple:

1) I wanted to maximize my moisture retention
2) I'm tired of always having to combat frizz
3) It's a great, chemical-free way to nurture your hair

Learning about my hair I've realized that it's low-porosity, fine hair, 4C hair. Because of this I have to go about the whole CG method differently than it says in the book. 

I found an incredible website: mahogonycurls.com that has a whole section dedicated to the CG method featuring different hair types and textures. That site actually helped me figure out how to apply my products and what products are CG-friendly.

Current Products

I'm currently using:

1) Aubrey Organics GPB Glycogen Protein Balancing Conditioner -- I use it as my pre-poo and to rinse my scalp. However it leaves a white residue so I think I'll leave it strictly as my pre-poo from now on. I also add my oil mixture to my hair as a pre-poo. Actually I apply the oil mixture to dry hair and then the conditioner. I leave it in for as long as I can stand. 

On Friday I had it in all day at work and then slept with it in overnight. I learned from some other low porosity, 4C, CG ladies that pre-pooing was a good idea to help with moisture retention. They found that their hair was dry without it. I also learned that it's best to apply moisturizer on low porosity hair when it is dry or damp, not wet. That way it will retain the moisture better.

2) Aubrey Organics White Camellia Ultra-Smoothing Conditioner -- This I will use as my cleanser but I previously used it as my detangler.

3) Yes to Carrots Pampering Conditioner -- This is used strictly as my detangling and leave-in conditioner.

My CG Method Application Process

My process is to pre-poo first in sections then I wash my scalp, rinse, then detangle. I will typically rinse out most of the conditioner (another thing I learned on youtube) then dry my hair with an old t-shirt. 

Once it's not dripping wet I apply the gel. If I don't do that I will have white residue in my hair and it will take a long, long time to dry. 

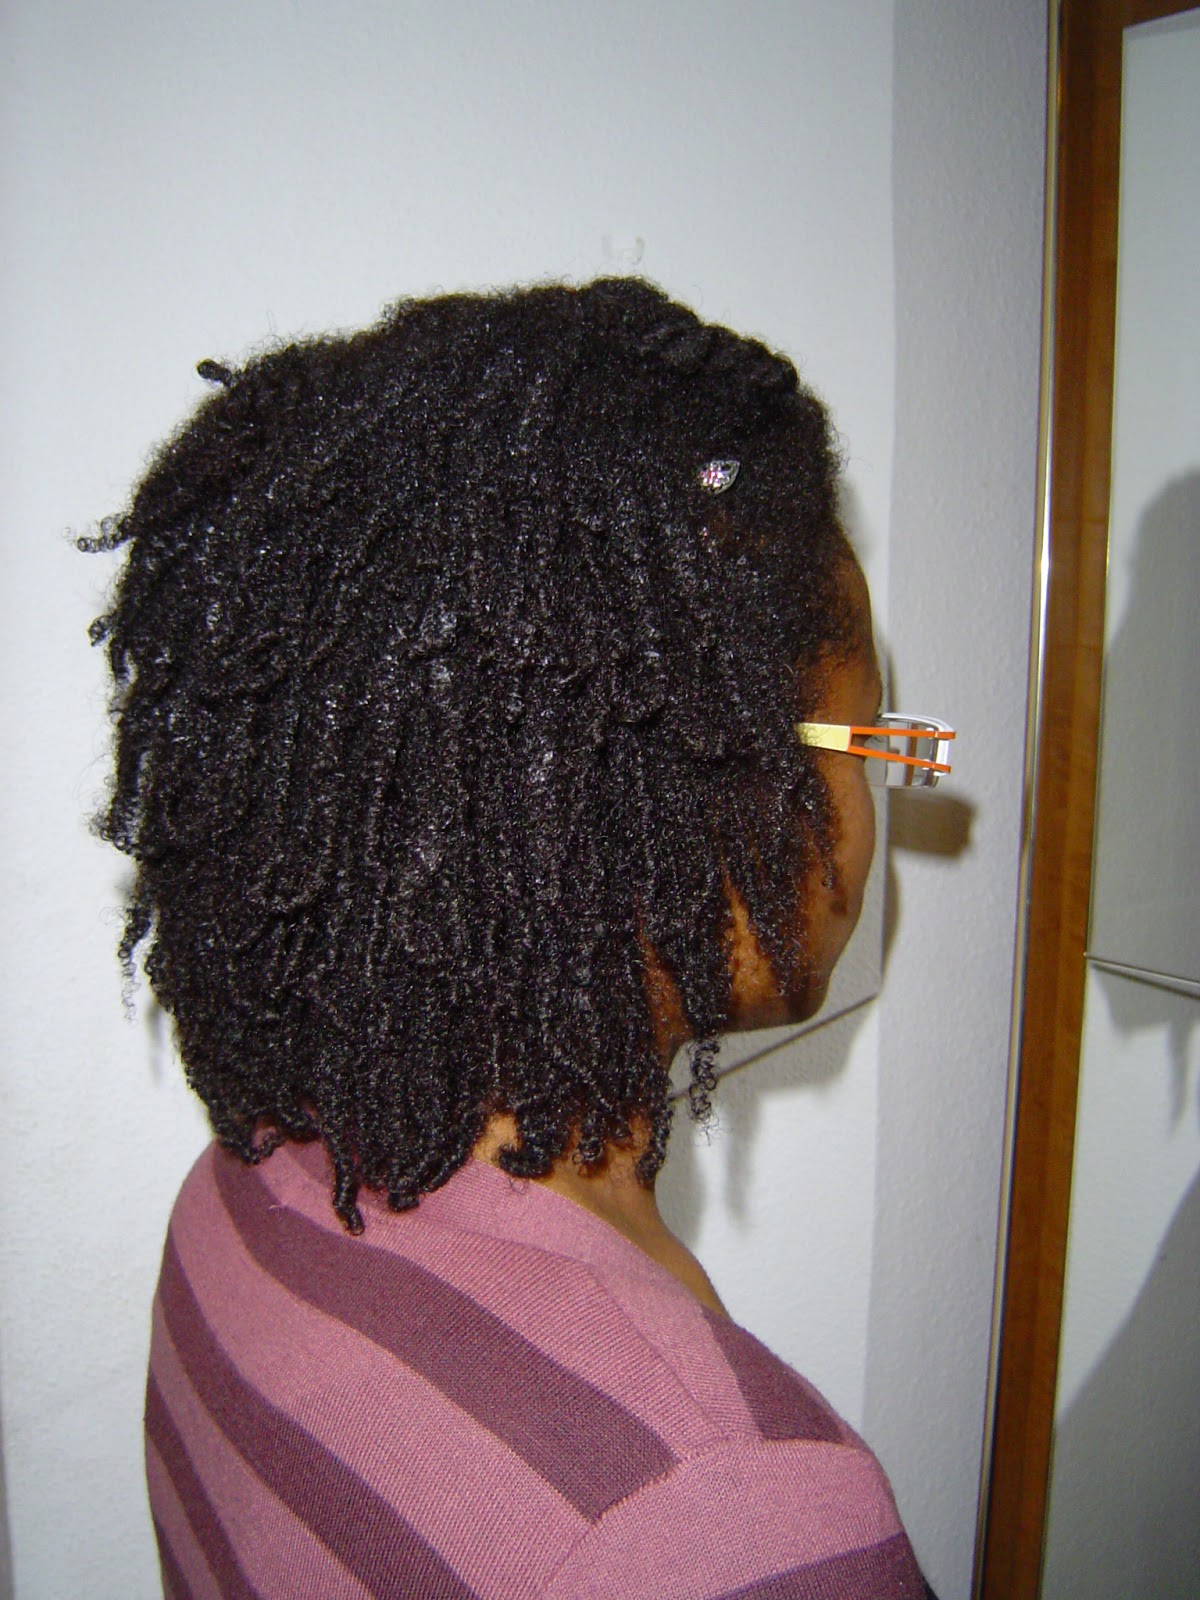
Interestingly I can get different looks. When I take the time to smooth gel in each section I end up with a big, defined, curly afro type style (sorry, no picture this time). When I do the "scrunching" like it says in the book, it turns out a lot more tame (picture down below). I like both ways.


I don't always do a wash-and-go because it takes forever (more than 15 hours) to dry and it's too cold to go out the door with wet hair. It will be so much easier in the summer. So I either wear my hair in a big ponytail or an updo.

For bed I tried the pineapple method but was not impressed. My hair was not completely dry the  first few tries so it ended up poofy at the roots and curly at the ends. In the morning I had to just style it in a ponytail.

I've adapted that method and instead make little loose ponytails. I tried four at first but now I think I'll stick with one. This help to stretch my hair at the roots so I don't end up with a big puff in the morning (unless that's the look I'm going for).


When I work out I just twists up my bangs and secure them with a bobby pin. I put the rest of my hair in a low ponytail with a headband.


What I like so far

I LOVE the curl definition! Once I'm able to let my hair dry completely without touching it I will be frizz-free! The crown and the hair that frames my face are the areas in my hair that are the hardest to combat frizz. However, I'm still learning and I won't give up.

Another thing I love is that it takes no time at all to do my hair. I thought it would be a long, complicated, process but it's the complete reverse. It also makes my hair big and full. Sometimes it's hard to feel that way with fine hair.

I've also noticed immediately how soft and moisturized my hair has become. I was worried because many people who have tried the CG method stated that the first few weeks their hair was dry and unmanageable. This was not so with my hair.

Once I get the whole technique down with the gel I'll be a lot happier with the results. I'm just really thankful that there are so many tools out there on the web and on youtube. They have been incredibly helpful to me. 

I hope my experiences with the CG method, which I intend to continue to document, can also help someone else.

Friday, February 1, 2013

Vegan Recipe: Oatmeal Raisin Cookies


I caved people! I just couldn't wait until next week to share my first yummy vegan recipe of 2013. It seems fitting to introduce the first new recipe with the start of a fresh, new, month.

Happy February all!

To (re) jump-start this vegan recipe series we'll start with a ridiculously easy dessert recipe. My last vegan recipe was Chinese inspired noodles with dulse and chia seeds

I initially wanted to provide a recipe every Thursday but that didn't exactly work out as the above recipe was posted last year!

However, now that I have my spectacular vegan cookbooks, plus re-newed imagination and creativity, I will be bringing a new recipe every week. 

As you can see the hubby and I are loving our vegan lifestyle. What initially started off as a 6-month vegan challenge became so much more. 

We are 15 months vegan and going strong. We're even trying to incorporate more raw, or live, foods into our diets. This summer we will be starting another challenge of sorts. (More on that later)

As for the vegan recipe series, I don't want to pin myself down to a particular day of the week, because life happens. Simply enjoy the first of this delectable series and watch out for more to come! 

I made another version of these oatmeal cookies awhile back but these are definitely the improved version. I mean delish!

Oatmeal Raisin Cookies

1/3 cup non-dairy milk
2 Tbsp ground flax seeds
2/3 cup brown sugar
1/3 cup vegetable oil
1 tsp pure vanilla extract
¾ cup flour
½ tsp ground cinnamon
1/8 tsp ground nutmeg
¼ tsp baking soda
¼ tsp salt
1 ½ cups quick-cooking oats
½ cup raisins

Preheat oven to 350 degrees Fahrenheit. Line your baking sheets with parchment paper. In a large bowl mix together the non-dairy milk and flax seeds. Add in the sugar and oil and mix until it resembles caramel, about 2 minutes. Mix in the vanilla. Sift in the flour, spices, and salt, mixing the dry ingredients as they are being added. Fold in the oatmeal and raisins. Drop dough in generous tablespoons onto the baking sheets. Flatten the tops a bit, since they don’t spread much. Bake for 10 minutes for chewy cookies and 12 minutes for crunchy cookies. The recipe makes 2 dozen cookies.


 This recipe is courtesy the fabulous cookbook: Vegan Cookies Invade Your Cookie Jar, by Isa Chandra Moskowitz & Terry Hope Romero