Jump to What Interests you Most

Search This Blog

Showing posts with label youtube. Show all posts

Saturday, October 26, 2013

Achieving Six Pack Abs: Month 1 Update


The last exercise for this month was done today right before I had lunch. I have a HIIT (high-intensity interval training) workout to do every Saturday. But I wanted to do something a little different, and more challenging, than simply doing sprints.

So I did this HIIT program I saw on a new channel I subscribe to on youtube called fitnessblender. It was one of those descending workouts. I started with 10 reps of burpees, 10 side lunges, 10 push-ups and 10 jump lunges. Then with each subsequent set I would go down a rep until I finished with 1 rep of each exercise. Definitely click here to see the workout.

I was sweating like a you-know-what by the end! It was deceptive because I didn't feel ridiculously tired immediately after. However, about an hour later everything was sore and I even had to take a nap! It was great.

Overall, I do notice that my body feels different. My husband says that my muscles are way more defined and after a workout he can see my six-pack peeking through. I don't see any difference in my abs but I can feel a difference all over my body.

Actually, after I did my HIIT workout today I could see my abs as well. I just need them to stay like that all the time! But I'm hopeful that I will have accomplished a lot by the end of December.

On Monday I start weeks 5-8 and for this month I will increase my weight so I'm only doing 6-8 reps for each exercise. 

(I will be doing the same exercises so look at my weight routine to see what I'm doing). 

I will also add another HIIT workout. Currently I only do HIIT twice a week but I will start doing it three times a week. Probably by incorporating exercises I can do in the house to just break up the running routine.

Running has been great. That 7.5K race I did last week, I found out later that day that I came in second place! So I have to get my trophy at some point next week.

On November 3rd I'm running a 16K race that I signed up for today and at the end of November I'm running a half-marathon that the city of Córdoba has every year.

All in all I'm pleased with the program and I can't wait to see what my body looks like at the end of November! I will take pics at that point and post them to the blog.

Monday, September 9, 2013

Back Exercises

In the post Acheiving Six-Pack Abs I mentioned that I also planned on working my back more than I have done in the past. 

This is just so I maintain good posture and balance in my body. I don't remember where I read it but somewhere online I read that when working the abdominals it is also imperative to work the back. It makes sense to me!

The back is also another muscle group that I've neglected in the past. So I'm hype about finally working it out. Of course I will continue to work my legs and arm muscles as well.

These exercises focus on the lower and upper back and are pretty basic. I figure I can start out slow and then increase intensity. I definitely do NOT want to injure myself.

Please check out the She Knows website for more detailed information about the exercises.

1) Dumbbell Single-Arm Overhead Squat -- I have never done this exercise before


2) Dumbbell One-Point Row -- I've done this one and it's challenging because I'm not flexible at all in my lower body


3) Lat Pullover


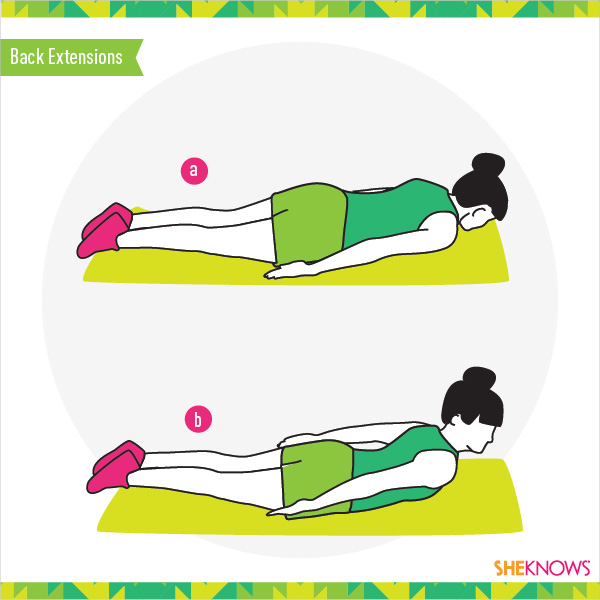
4) Back Extensions -- These are fun because you can really feel the muscles in the back working


5) Dumbbell Bent-Over Row -- Oldie but goody


The rest of my weight training schedule I probably won't "plan" exactly. I don't want to get bored with the exercises. So I plan to do a bit of browsing on youtube and other fitness sites and just pick and choose as I see fit. If I find any truly interesting or super challenging ones I will share them on the blog.

However, the ab and back exercises I'm going to stick with exactly until I need to increase intensity.

Sunday, September 8, 2013

Achieving Six-pack Abs

I believe I have found the right mix of exercises to get me my 6-pack abs! Obviously I will be doing this in combination with:

1) Losing weight 

I don't really need to but I do need to lower my overall body fat percentage a bit so that my abs can be seen. I realize that it is impossible to target specific parts of my body to lose fat. So this will be an overall fat loss for my entire body. 

I found this website that is pretty useful if you want to roughly gauge how much body fat you have without buying those expensive fat measurement tools.

According to this website (called AthleanX.com) I have a Body Fat Percentage of : 24 – 26%

"This body fat percentage is considered the low range of average for women in many body fat charts.  At this level a woman is generally considered to look slim, but not too skinny.  Curves in the hips, thighs and buttocks will be apparent at this range."

To get my 6-pack I want to reach a Body Fat Percentage of: 18 – 20% 

"The 18 – 20% body fat range is a more reasonable target range for women who are after that ‘athletic’ look because it’s easier to maintain than the higher levels.  This body fat range is the one that’s most associated with a killer bikini body! At 18 – 20%, you can still see strong ab muscles, but the six pack may not be as defined.  While there’s a small amount of fat on the hips, thighs and bum it’s not very noticeable.  Many women reaching for higher levels of fitness prefer this look since it retains some curves."

Definitely go to the website if you want to read more about these different ranges. I chose this range because it seems like the more realistic goal for me, a normal person, who is not a professional athlete. 


 2) Lifting more weights in general. 

Weight training has always been secondary to my running. But since I'm not officially training right now I want to make weights more of a priority. I will still run. (Duh) Like I said in my last post I will run 5 days a week as my challenge. (This will also help me to lose more weight). 

There is a great youtube channel called ZuzkaLight and she has seriously hard workout programs on there. I know I've mentioned her channel before. Once I finalize my weight program I will update the blog.

3) Incorporating more back exercises

Rarely, if ever, do I focus on my back. I read somewhere online that when focusing on your abs you also need to strengthen the back. This helps to give you balance and not wreck your posture. Again, once I put together my back routine I will share it on the blog.

How to Get Six-pack Abs

Okay, now to the nitty-gritty. Here is how I will exercise my abs. I found this great fountain of information on WikiHow and I plan to follow it as exactly as I can. So check it out for more details. 

The AthleanX website also has a youtube channel where I found this really informative video on how to target all the muscle groups in the abs.

I recommend watching the video if you want more detailed explanations and examples of exercises to do. But here is what I understood from the video and from the Wiki. (You can google all these exercises and then click on images to see what they are like)

a) Bottom up including rotation --These are exercises that stabilize the upper body while the lower body is working the abs.
  • pendulum/windshield wipers
  • butt ups
  • using a stability ball get into plank position with insteps of feet resting on the ball. Bring the ball up to your chest and to the side, go back to start position. Repeat alternating sides.
b) Lower ab movement
  • leg raises (with or without a stability ball)
  • reverse crunch
c) Mid-range movement (also called both up) -- Mainly exercises that move the upper and lower body simultaneously
  • jacknife sit ups
  • V-sit up
  • medicine ball toe up
d) Top down including rotation (upper ab movement)--These exercises move the upper body while stabilizing the lower body
  • ab roller
  • crunches on stability ball (placing legs on a wall)
  • sit ups
e) Obliques--If you don't know these are the muscles that run up and down the sides of the abs
  • side crunch with leg lift
  • bicycle crunches
f) Resisted extension movement (upper body)-- Where forces want to pull you backwards but you won't let it
  • core death march
  • dead lifts
  • side plank with weights
  • hold arms out in front of you and rest them against a door frame. Try to push your arms into the frame. Obviously the door won't move and your hands shouldn't either.
g) Resist rotation movement (lower body) --Any exercise that forces you not to move your abs. This type of isometric move is a key function of the abs that is often times not trained.
  • hold plank (in normal push up position) and bring legs to chest
  • lunges with weights
The list of ab exercises that fit into these categories are endless but I figure this a good list to get me started. I plan to start this regimen (including the back exercises and weights) in October. So it should give me a bit of time to get my head right and get the rest of the exercises together.

I would like to create a photo diary but I'm not sure yet. If I do I will take the first picture in October and update it every month to track my progress. 

However, I will probably post the pictures to the blog every couple of months? Not sure yet but I feel like I do need something visual to track my progress.

Tuesday, February 26, 2013

Curly Girl Method: Week 3

While I'm enjoying the CGM method, I find that I don't have time in my schedule right now to "shampoo" twice a week. I'd prefer to re-wet my hair after my initial "shampoo" day so that my hair stays nice and soft but it's not possible.

Here's another style that I wore last week after I did my wash and go. It wasn't that cold outside so I just decided to go with the flow. I wasn't convinced of it's "cute-ness" (yea, I made up a word) but my husband liked it.


This week I put in my pre-poo/deep conditioner on Sunday but I was too lazy to rinse it out. So I just slept with it in my hair. I rinsed it out and shampooed with my conditioner and detangled on Monday. The detangle process is much easier and faster when I do my hair twice a week instead of once a week. Hopefully I have more time in the summer.

However, this week we are going through a cold spell, so I knew I wasn't going to wear my hair out wet. So I put it in some medium-sized twists and wore my beanie. This afternoon I took them down to rock a twist out and I loved the results! This is going to be my go-to style until the warm weather starts.

I will do my hair, twist it up and leave them in for 24 hours. I will rock a twist out for 1-2 days, then after that I will put it in updos. The only thing I had on my hair for the twists was my leave-in conditioner, and some gel. I got the best twist-out results I've ever had.

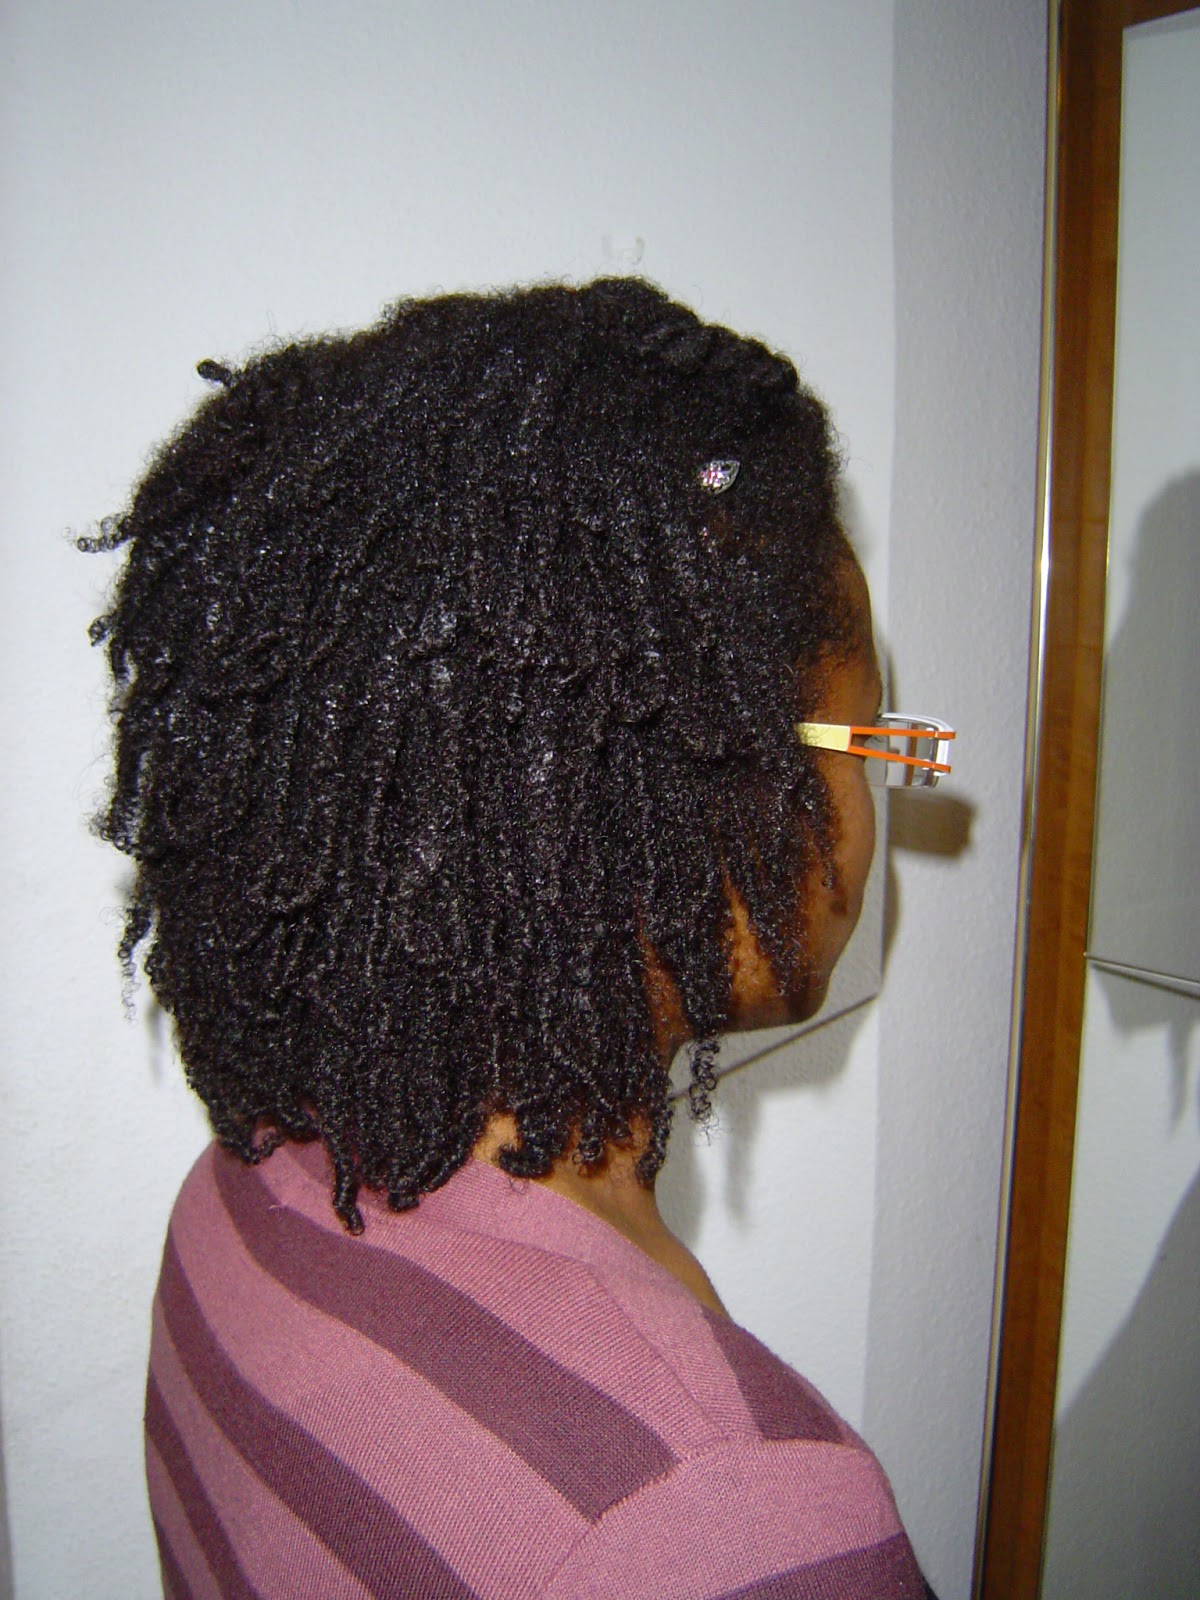
The pictures below don't even do it justice. It looked nice and full and defined and super soft. These pictures show what my hair looked like before I separated the twists.


I didn't put any oil or anything on my hands when I separated the twists because my hair was incredibly moisturized. The CG method is the best! I then separated them and what I ended up with is below.


I haven't decided how I'm going to prepare my head for bed yet. I will probably put it in a bun (got the idea from a youtuber) or twist it back up in bigger twists.

Then tomorrow I will wear it out and then following days it will be up until I wash it again. I'm truly loving this Curly Girl Method journey.

Sunday, February 17, 2013

Curly Girl Method: Week 2

The Beginning -- Why the CG Method?

I say week 2, although I've only washed and styled my hair using the CG method 4 times. I received the book in the mail a couple of weeks ago and read it cover-to-cover (DVD included) in a few hours.

Yes, I was excited to try it! It is said that it takes 6 weeks for your "real curl pattern" to emerge, or to "train" your hair. So this will be a 6 week initial journey to see how my hair develops.

My reasons for trying the CG method were simple:

1) I wanted to maximize my moisture retention
2) I'm tired of always having to combat frizz
3) It's a great, chemical-free way to nurture your hair

Learning about my hair I've realized that it's low-porosity, fine hair, 4C hair. Because of this I have to go about the whole CG method differently than it says in the book. 

I found an incredible website: mahogonycurls.com that has a whole section dedicated to the CG method featuring different hair types and textures. That site actually helped me figure out how to apply my products and what products are CG-friendly.

Current Products

I'm currently using:

1) Aubrey Organics GPB Glycogen Protein Balancing Conditioner -- I use it as my pre-poo and to rinse my scalp. However it leaves a white residue so I think I'll leave it strictly as my pre-poo from now on. I also add my oil mixture to my hair as a pre-poo. Actually I apply the oil mixture to dry hair and then the conditioner. I leave it in for as long as I can stand. 

On Friday I had it in all day at work and then slept with it in overnight. I learned from some other low porosity, 4C, CG ladies that pre-pooing was a good idea to help with moisture retention. They found that their hair was dry without it. I also learned that it's best to apply moisturizer on low porosity hair when it is dry or damp, not wet. That way it will retain the moisture better.

2) Aubrey Organics White Camellia Ultra-Smoothing Conditioner -- This I will use as my cleanser but I previously used it as my detangler.

3) Yes to Carrots Pampering Conditioner -- This is used strictly as my detangling and leave-in conditioner.

My CG Method Application Process

My process is to pre-poo first in sections then I wash my scalp, rinse, then detangle. I will typically rinse out most of the conditioner (another thing I learned on youtube) then dry my hair with an old t-shirt. 

Once it's not dripping wet I apply the gel. If I don't do that I will have white residue in my hair and it will take a long, long time to dry. 

Interestingly I can get different looks. When I take the time to smooth gel in each section I end up with a big, defined, curly afro type style (sorry, no picture this time). When I do the "scrunching" like it says in the book, it turns out a lot more tame (picture down below). I like both ways.


I don't always do a wash-and-go because it takes forever (more than 15 hours) to dry and it's too cold to go out the door with wet hair. It will be so much easier in the summer. So I either wear my hair in a big ponytail or an updo.

For bed I tried the pineapple method but was not impressed. My hair was not completely dry the  first few tries so it ended up poofy at the roots and curly at the ends. In the morning I had to just style it in a ponytail.

I've adapted that method and instead make little loose ponytails. I tried four at first but now I think I'll stick with one. This help to stretch my hair at the roots so I don't end up with a big puff in the morning (unless that's the look I'm going for).


When I work out I just twists up my bangs and secure them with a bobby pin. I put the rest of my hair in a low ponytail with a headband.


What I like so far

I LOVE the curl definition! Once I'm able to let my hair dry completely without touching it I will be frizz-free! The crown and the hair that frames my face are the areas in my hair that are the hardest to combat frizz. However, I'm still learning and I won't give up.

Another thing I love is that it takes no time at all to do my hair. I thought it would be a long, complicated, process but it's the complete reverse. It also makes my hair big and full. Sometimes it's hard to feel that way with fine hair.

I've also noticed immediately how soft and moisturized my hair has become. I was worried because many people who have tried the CG method stated that the first few weeks their hair was dry and unmanageable. This was not so with my hair.

Once I get the whole technique down with the gel I'll be a lot happier with the results. I'm just really thankful that there are so many tools out there on the web and on youtube. They have been incredibly helpful to me. 

I hope my experiences with the CG method, which I intend to continue to document, can also help someone else.

Saturday, January 19, 2013

Hair Update: 1-month In

I mentioned in my New Year's Eve post that I had some new hair goals this year. (Read that post if you want to know in more detail). In that post I promised I'd come back each month with an update on how things have been going.

Well, so far I have been loving taking a break from twists! On wash day it makes the process so much easier and quicker. It's a breeze to detangle my hair and after my deep conditioning I don't have to waste time putting in twists. I just moisturize and then put it in 4 chunky twists for bed.

I've also been experimenting with oils in my deep conditioner. I love castor oil in my deep conditioner because it makes my hair ridiculously soft. Last week I also added some sesame oil to it (not the toasted sesame oil you put in Asian cuisine!) in addition to my olive oil, jojoba oil and castor oil.

Besides the ease of wash day, I've also been able to be more in tune with my moisture levels. When I wore twists it was harder to gauge when my hair needed moisture. Sometimes I wouldn't even moisturize because I didn't want my twists to get fuzzy.

Since I take my hair down every evening to prepare it for bed (and every morning to style) I can feel and see when my hair needs something. I'm also able to pay special attention to my ends. I get a lot less tangles.

In the morning it does take me longer to do my hair but the benefits outweigh the cons. I'm also forced to actually learn to style my hair without the aid of twists. For the past two weeks I've been trying roll, tuck and pin styles courtesy BlakIzBeautyful on youtube.

Every so often she has a winter protective style tutorial that is just so easy to try. So I'm getting better with experimenting with styles that aren't too complex for my skills.

This style here is just a roll, tuck and pin with a bang and the back rolled up.


The next one also features a bang but the back is my version of a french roll.


The last style is super, duper easy and a definite go-to style when you don't feel like doing you hair but want it to look decent. Here's my version of the high-bun.


As for the Curly Girl Method, I bought the book but my sister has to ship it to me from the US. Once I receive it I will read it (obviously) and see whether it's something feasible for me to do. Right now I'm simply enjoying my hair and re-realizing the joys of being natural!

Tuesday, November 20, 2012

End of the month check-in


The plan was to do my henna gloss treatment this past weekend. So I left my hair out so that I wouldn't have to worry about taking out a bunch of twists. 

I wore my hair Monday-Wednesday as shown in the above photos, last week. Then I just put them in chunky twists for the rest of the week. (By Wednesday the puff was humongous!)

Saturday I had an all day conference to go to in another city (Seville). I got up at 6:15am, took the train at 7:55am and didn't get back home until 9:00pm. The plan then was to do the henna treatment the following day.

However, I got sick while at the conference. Go figure. I still am sick actually. I didn't want to sit around with a wet head while sick so it's been postponed. I guess with all that recycled air on the train and in the conference rooms...I caught something.

It sucks because it's just bad timing. The last time I was sick was this time last year! Plus it does have me worried about the half-marathon on Sunday. 

Of course I'm not even going to attempt to run this week until I feel 100%. That might mean that I have to run the half-marathon after only running twice after my full marathon.

That's completely unimpressive, but what can I do? It will be a bummer but I don't plan on running the half-marathon either if I'm not feeling better. Yes, this super sucks.

I also wanted to try this new workout I found on youtube but I guess it'll have to wait until next week:


My wish is to feel better by Wednesday. (As if I could control it, right?) But I have a feeling this decision is going down to the wire...

Saturday, July 21, 2012

Henna Gloss and Summer Hair Routine

HENNA GLOSS

I took the advice of a friend of mine and decided to try a henna gloss treatment courtesy of CurlyNikki.


While my application still "needs some work," this time around my Henna experience was great! It was so much easier and FASTER to apply. It probably only took me 10 minutes to do my entire head, maybe less.

Again, the application wasn't perfect, but it was much more uniform than my previous two applications. I can definitely see myself sticking with the Henna gloss treatment. I won't do this every month (because I don't feel like it) but I will do it more often.


To make this mix you just prepare the Henna as you would any treatment. Here's what I use:


1 100g box neutral Henna (meaning no color)
1 cup (250ml) green tea (I use 3 tea bags)
1-2 Tbsp. honey


Then you add the "gloss" factor, which is  1 cup (250ml) of your favorite conditioner. The one I have is a Tresseme product. It should be protein-free but I say use what you have because that's what I did!

I only lasted 4 hours with this stuff on my head because I was hot even with the air conditioning. If you do Henna for the color benefits you should leave it on for at least that much time. 

I usually leave it on for 8 hours. I wanted to try sleeping with it on, since that assures it will be on for a good amount of time, but I can't do it! I like to be comfortable when I sleep. What can I say?

So I just put on a plastic bag over the hair, lined it with some cotton-ball like material and then covered it with another plastic bag and some more cottony stuff. (To catch the leaks)


I know, not the best photos. But I had to take them myself as the hubby was occupied with his bike. 

After the 4 hours were up I proceeded to rinse out my hair really well. This is another step that is made easier with the Henna gloss recipe. I used more conditioner to rinse but I made sure to shampoo my scalp. I like a clean, itch-free scalp!

Then I deep conditioned and put in some seriously chunky twists in my hair. That's it! I seriously recommend this treatment to all newbie Henna people out there. 

SUMMER HAIR ROUTINE

My summer hair routine consists of protective styling and low-manipulation. That means I leave my twists in for as long as possible before taking them down to detangle and remove shed hairs. This time around I left them in for three weeks.

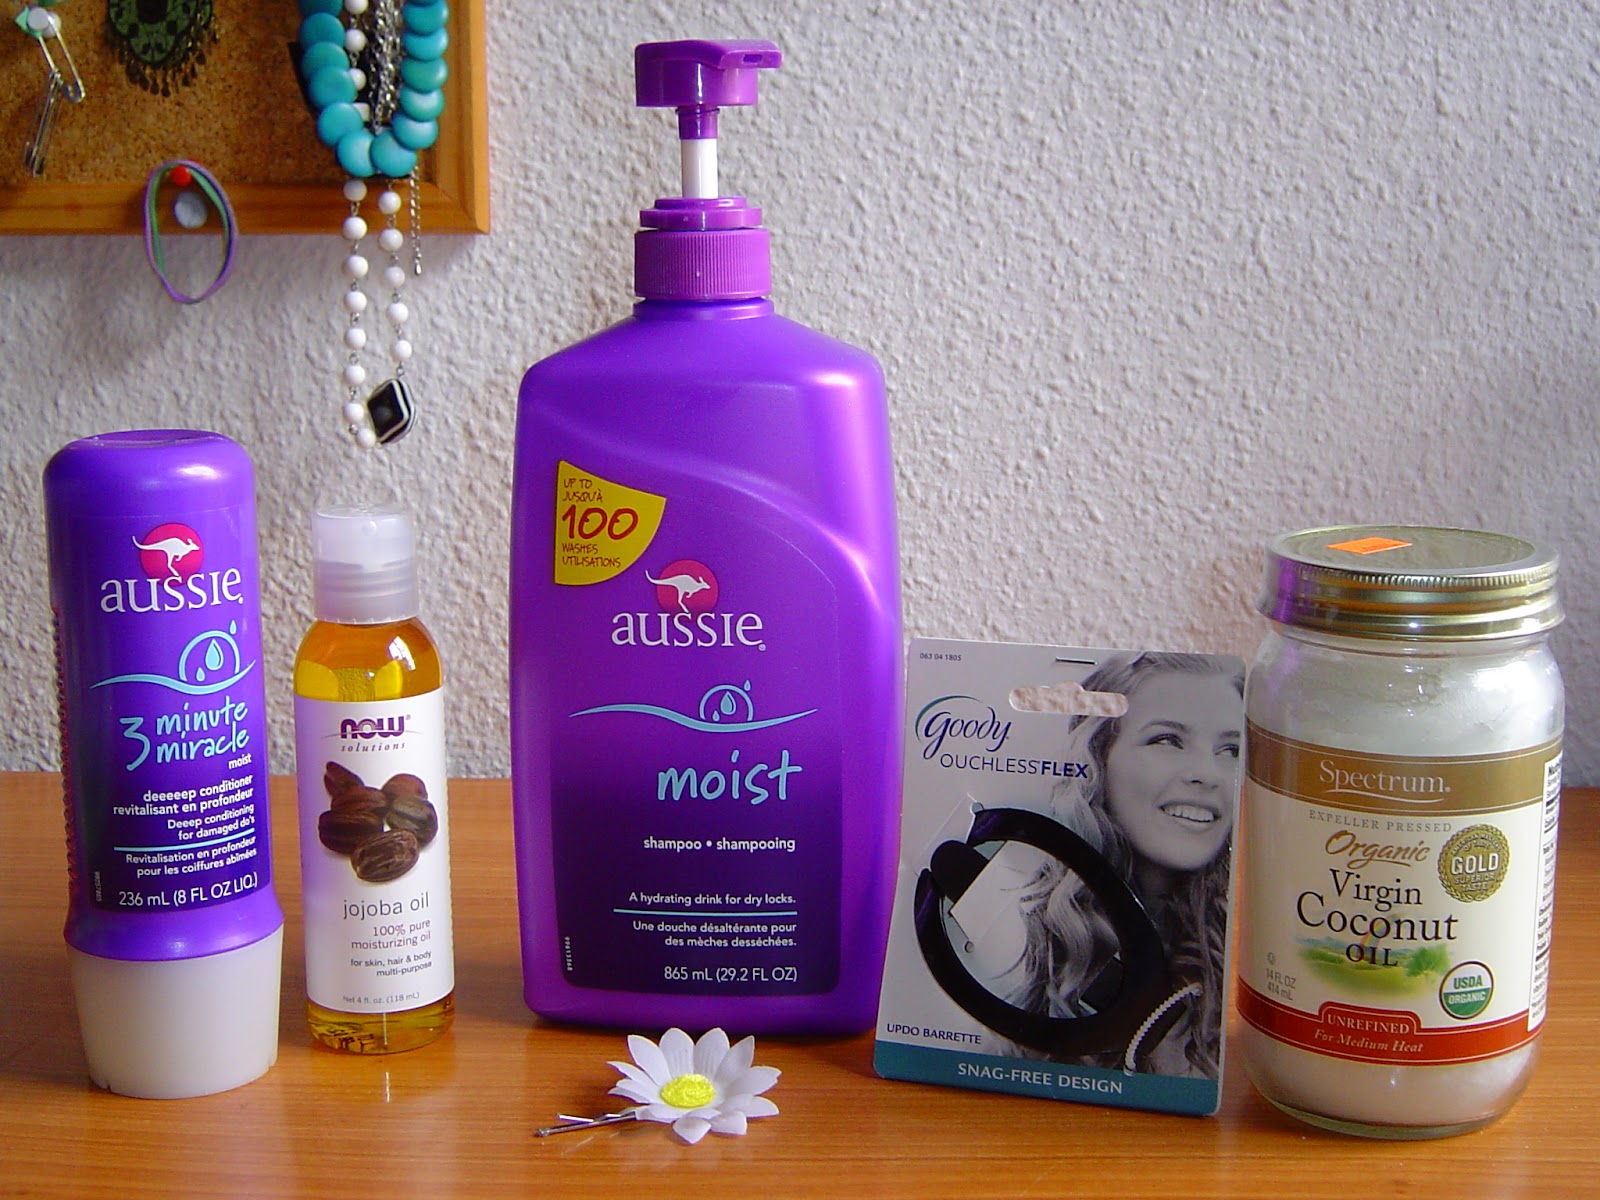
After the first week I condition wash and do a quick deep condition treatment with my Aussie 3-minute miracle product. 

The 3-minute miracle is the product on the far left.

This is mainly to make sure I have a clean scalp. I then moisturize and oil my scalp.

The second week I shampoo and do a more thorough deep conditioning. Then I moisturize and oil my scalp. 

All of this is I do with the twists still in my hair. I also make sure to moisturize my hair throughout the week as needed. 

The third week I take them down, detangle, remove shed hair, and prep for the shampoo. I was nervous, but the take-down was so easy! My hair tangles easy, especially when it's frizzy, so I was worried there'd be a long struggle.

But I took the advice of a youtuber (BeautifulBrwnBabyDol) and used some coconut oil and shea butter to help me. I just applied it to my twists then put them all up in a ponytail.

I removed each twist individually, detangled and removed shed hair. I then clipped it out of the way to work on the next twist. Definitely check out the above link if you want detailed information. 

I also took the opportunity to give myself a good trim because I haven't done one in a looooooong time!

This was about how much hair I cut off in total.

I then put my hair in about 5-6 sections and sprayed each one down with a mixture of: 

water
aloe vera juice (to establish a pH of 5)
conditioner
10 drops rosemary essential oil
coconut oil


My hair was dry and I didn't have the time to apply the Henna treatment that day. So to keep each section nicely stretched and moisturized I sprayed them and then twisted them back up until I could do my hair the following day. 

I ran in the morning and while I was showering rinsed my hair with some conditioner (still in the same sections). I put on a shower cap (actually a plastic bag!) to keep my hair moist until I applied the Henna treatment.

Of course I won't apply the Henna gloss each time I take down my twists but I will follow the same procedure. My hair was super soft and manageable and made shampooing a breeze!

The good thing about this routine is that I know my hair is staying healthy in all this hot weather. But since I have to moisture a lot more often, my twists frizz up quicker. 

I combat that by using my Janet Collection Afro Puff.


This helps me keep my hair in the best of condition while protecting it from the harsh weather...and still look presentable! I just jazz up the afro puff when I get bored with a flower, headband or scarf.

I plan to keep this up for the rest of July and into August. It usually stays pretty hot here in September as well so we'll see.

But I'm loving the ease of getting ready when I have to go out. I don't have to worry about what to do with my hair!


Wednesday, July 11, 2012

When technology strikes back!
This post is not running related, training related, vegan recipe related (I need to post more recipes!) or anything to do with hair, but I had to share.


For Christmas 2011 I was gifted with a Kindle Fire.

GoogleImages
It was such an odd gift because I am really not into technology. Or, more accurately, ever since my Macbook Pro broke on me after only 3 years of use. 

(i.e. "planned obsolescence" Click here or here for more info on that. Definitely check out youtube as well!) 

My attitude towards technology became cynical.

I refused to purchase another Mac product and the iPod nano I have was another gift. The computer I'm currently using to type this post was a gift as well. 

I sold my TV last year and my cellphone is basic. It does have a camera, which tempted me to throw it away, but I guess I need one in this day and age.

So when I got the Kindle Fire I was thankful (it's the thought that counts) but had no idea what I was going to do with it. 

With the purchase came a 1-month free trial of Amazon Prime. It allows you to watch all the free movies and TV shows you want. I'm no dummy. I took advantage of it.

After that month was over my Kindle Fire pretty much just collected dust. I'd use it when the hubby was on the computer doing some work and I wanted to check my email or watch some youtube hair videos. But that was it.

Since I've been on vacation I've noticed that I have a lot of free time that I need to use up. There's only so many videos on youtube to watch in day, only so much running I can do, and, finally, only so many movies I can watch.

With all this free time I rediscovered the novelty of my Kindle Fire. I started downloading tons of free books. These were books that I would never buy in "real" life like: 

  • romantic novels
  • thrillers and even
  •  fantasy 

I would read on that device for hours. I was having a good time.

Up until I started having this localized pain on the left-side of my upper back, right between the shoulder blades. Not only did I have that pain but I also had a painful burning sensation in my chest, above my left breast, whenever I would move. 

That pain progressed into:

  • shoulder pain
  • neck pain
  • pain at the base of my neck 
  • even pain behind my ear

My first thought was to google my symptoms and, of course, the first thing I thought was that I was having a heart attack! 

Now, it seemed pretty unlikely because of my age and my lifestyle but that's what google told me! Suffice to say I was freaking out until I really started thinking about the type of pain. 

When I would stretch it seemed to give me some type of relief and I didn't have shortness of breath, dizziness or nausea. All symptoms that are related to heart attacks. So I did some more digging.

Apparently, having your arms extended for long periods of time, or in my case, having your shoulders rolled forward or pulled up, can cause pain in the trapezius muscle. These same activities can cause your chest muscles (pectoralis) to shorten and thus cause upper back pain.

This is the trapezius muscle.

As you can see, these are the parts of the body that are affected by the trapezius muscle.


Now, I'm no doctor, but basically the chest and back muscles are connected. Who would have known? Not me!

Long story short: my extended time on the Kindle Fire was proving disastrous to my muscle health. 

Once I found out the root of the problem I stopped using the Kindle Fire immediately. Right now I'm thinking of limiting the time I use it to 30 minutes a day. 

When I do use it, I will make sure not to round my shoulders or have my head down for the entire time. 

I will practice proper posture (as much as I can anyway)!


To help loosen up my muscles I perform stretches everyday that help to lengthen the chest muscles. As well as stretches for the trapezius muscle.

The moral of the story: 

  • Be careful when using technology, specifically computers and tablets!
  •  Don't use them for extended periods of time
  • Make sure you have proper posture 
  • Stretch when you are done. 
  • If you feel any pain definitely stop and stretch


While I'm still suffering from pain in those areas I know I won't make the same mistake again. It will take some time to fully alleviate the pain. But at least I'm not exacerbating the situation because I now know what caused it.

Listen to your body!


Wednesday, June 6, 2012

Vegan Recipe Starring: Dulse Leaf and Chia Seeds

Here's another vegan recipe that was inspired from this website. I had heard about dulse leaf on youtube from a woman who has been vegan for 20+ years. 

She said that it contains a lot of iron and is a good way to substitute the salty, fishy flavors in dishes. So I really wanted to try it.

My husband and I went to a health food shop in Seville back in March and bought a few things that are impossible to find in Córoda. 

I had never even heard of dulse until watching youtube so this dish was my first experiment with it. 

It's a type of seaweed, which we bought dried. Once you add a liquid to it, it softens up nicely. 

So you can choose to add it directly to your dish or simply soak it in water and add only the liquid.

We both loved the recipe. The salty, sweet, fishy flavors really mimicked authentic asian cuisine. I say if you're ever in the mood for some Chinese food, this dish is a great healthy alternative.

The chia seeds were not the protagonist in this recipe. But we have tons of them left so I hope to experiment with them this summer. There are some desserts and beverages and things I'm hoping to try with them so stay tuned!


Ingredients: 
soba noodles
2 Tbsp peanut or sesame oil
Any mix of fresh or frozen veggies you like
2 baby bok choy
4 green onions
1 Tbsp CHIA SEEDS (or sesame seeds)
½ cup DULSE LEAF

Sauce:
2 Tbsp minced ginger (I used 2 tsp. dried ginger)
1 cup soy sauce
4 Tbsp honey
4 Tbsp raw, shredded coconut
1 Tbsp sesame oil
1 Tbsp rice wine vinegar (or apple cider vinegar)
 
Cook the noodles according to directions and toss with sesame oil when done – keep warm. Prepare sauce by whisking all ingredients in a small pot, slow-simmering 10 mins. Prepare veggies. Stir fry veggies and sauce, tossing constantly until just done. Remove veggies and lower heat until the sauce thickens a little. Place veggies back in pan and then spoon over noodles. Sprinkle with chia seeds and dulse leaf and serve.